Wednesday, February 29, 2012

Feb 29, 2012 First Day of Plumbing

Washer/Dryer connections with utility sink in the middle.  Notice the pipe protections and the trap under the washer connections.  All of this piping goes to the Black Water.


This is the drain for the Energy Recovery Ventilation System.  Again a trap to keep the drain running without problems.


The blue is cold the red is hot.  All lines are home runs to the manifold using PEX tubing.

Notice one of the crew in the ceiling securing the lines in the ceiling.

They brought lots of connections.  

Notice all the pipe protections and the insulation on the PEX lines because this is the North Garage Wall for protection from freezing.


The treated rainwater comes in the white pipe at the bottom of the manifold, is distributed to all the cold lines including the Heat Pump Hot Water Heater at the top.  Comes back to the manifold from the Heater in the Red line at the top and is distributed to all the Hot outlets.

This is the drain for the condensate of the Heat Pump Water Heater.  


We had asked the Plumber to consolidate all the vents to only two openings in the roof.  They were able to do that,  This view is looking up over the manifold with all the vents on the East side and Kitchen side of the house connected together. 

Look how carefully they moved the vent pipe over this support and protected it as well.  Good Work.

The Hot Water Heater required a relief in case of high pressure.  I couldn't figure out why there were two of them.  Maybe the manifold had a release as well? 

This is the second hole in the roof for venting.  Looks like they missed it a little.  I am sure this will be booted and sealed.

Outside picture of the hose bib and the two relief pipes.  These will be rocked in and shouldn't be an air leakage problem.


Sunset in Texas from my front porch

Feb. 27 Monday After the Storm on Sunday


This is Anh Nguyen, CASA PLUMBING Supervisor on my job.  He had an interesting story.  He immigrated to the US from Viet Nam 30 years ago at the age of 27.  He had nothing when he arrived in the US--not even shoes-- and depended on a church sponsor and the government for food and housing but he repaid his debts over time.  He worked sometimes three jobs and 7 days a week 4am to 7pm and taught himself English from the TV and other workers.  He took the Plumber's License test when he could barely read English and never had any formal training other than 8th grade in Viet Nam.  He continues to support his family in Viet Nam as well as his family in the US.  He is now the boss of the crew and has the best work ethic I have seen in a long time.


When I arrived at the job site on Monday, this DOW Blue Board (20-30 4x10 ft x 1/2 inch  sheets) had been picked up by the storm winds and spread all over the site.  They were stuck on cactus, rocks and trees.  A lot of it was broken and will probably have to be thrown away.  This stuff costs $15 a sheet.  It was laying outside but with some heavy boards on it.  The wind just picked it up and sailed the sheets.


I installed the doorknobs on the front door and door going into the garage.  It actually works!  This is the bargain door I found in the back of the Home Depot store and have been storing for 10 months.  It normally sells for $350 since it is an Energy Star with triple pane and I got two of them for $150.  Great Bargain.

I wonder what that other hole is for?

Feb 25, 2012 Saturday


Front Porch Ceiling  The posts are yet to be wrapped in Hardie.


Back Porch Ceiling.  This is the Soffit Crew Supervisor, Antonio.  The ceiling will eventually be painted some shade of blue.


Antonio takes a great deal of pride in his work and appreciated someone taking pictures of his work and bragging on him.


Front Porch Soffit and Ceiling work still going on.  It took three solid days of 4 people working to complete the facia, soffit and cornice.  Even at that, Anthony came back by himself on Monday and worked all day

Feb. 24, 2012 Friday Work Continues


Early Morning and work continues on wrapping the front posts in hardie.  The green areas will eventually be covered in white local limestone.


Compare to two days ago and it is obvious how much work has been completed.  These guys are moving fast.


Notice the ceiling is not covered, but will be worked on today.


View down the East side of the house


View down the North or back side of the house.  These posts will also be wrapped with Hardie and the ceiling of the porch covered with Hardie.


This is the wall between the Garage and the envelope of the house.  I had to insist on putting 1 inch of foam (DOW blue board) to insulate from the heat of the West-facing Garage.  We ran out of the Green Wall ZIP so had to order more since I wanted this wall to emulate the outside walls which have ZIP System R-6 which was special ordered with 1-inch of foam attached to the 7/16 OSB which has a special air/water barrier sprayed on it.


View from the West side looking into the Garage


This is a very important measurement of the energy efficiency of the windows.  This sticker is for the casement windows that open.  The U factor of 0.17 is the overall measurement of insulating including the frame. The lower the better. The SHGC is also an important measurement of how much heat is allowed to pass through the glass from direct sun.  Up North, they want the warming from the Sun.  Down here in Texas, we don't want the heat but also don't want the windows to be dark..so the Visible Transmittance has to be balanced as well.


This sticker shows better measurements but the difference is this is for the fixed portion of the bank of windows.  Again, a trade off that I tried to balance for the times in the "shoulder seasons" when we want to open the windows.

Feb. 23, 2012 More Progress

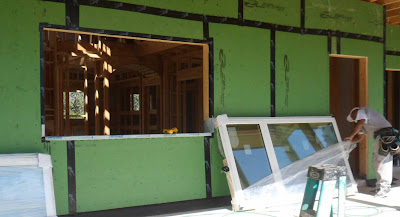
The Doors and windows were installed today and we found several problems.
One of the windows did not have the handle mechanism..has been ordered.
This double glass french door had damage to the fiberglass in several places.  They are sending someone from the local ThermaTru Door place to fill it is and paint the three places.  
The back double door has the latch in backwards.  It has to have the correct latch and it isn't reversible so that has also been ordered.  Won't be here until mid March.  Not good since I can't lock the house since the door won't catch on the latch.  


Finally completed the roof but having problems getting the crew to understand the tape has to be pressured with a metal roller with some consistency.  I didn't think the tape was being applied correctly....turned out when the cold front blew in over night...sure enough the tape began to flap in the wind.  The crew will have to go over all this tape again.  We'll see if the roof is going to keep out the water since we expect rain as well.

Feb 22, 2012 Progress

Detail of the rock cornice.  The rock will go behind the little ledger.  All the soffit, cornice and facia (aren't you impressed that I have learned all these building words?--maybe not how to spell them.) are out of Hardie which is a cement impregnated material.  
I was burning some of the trash that is building up and threw in some scraps of this material and IT WILL NOT BURN!
The question is: How do we ever get rid of it?  won't burn, won't decompose, Maybe it can be recycled?  I hope so. I don't want to add it to the garbage dumps.

Small gable over the front door.  The green part will have rock on it. 


Front Porch that may be screened in in the future...depending on the bugs.

Interesting edge on this soffit due to the shortened roofline.  I couldn't figure out why the drafter did this but the Soffit guy, Antonio, knew exactly how to make it look good.  

Back porch with the soffit going up.

Back of the house and the last to be roofed.


This guy was amazing as well as the guy throwing these 4x8 panels up 10 ft in the air.  No safety line and he was walking on some pitches 8/12 on the bare rafters.  He nailed on the entire roof while others on the crew did the taping.


Notice the multiple seals: 1.Tape on the ZIP System, 2. Moisture Seal on corners and sill of window- wraps around to inside, 3.  Silicone caulk on sides and top (not on bottom, 4. Window flanges nailed to ZIP and taped again with ZIP tape but not on bottom so water can escape if it somehow gets inside the window.

Waiting for window shims.

Window on the back for the bedroom.  The double glass doors are to the right.  The latch was reversed so we could not close or lock the doors.  May be fixed sometime in March.  The latch/locking system is all connected.  The window/door manufacturer should have know better.

Fixed window in the gable to let in sunlight.  Notice there is still a shadow from the overhang that will be even more in the summertime.

You may not be able to see that the one guy has an extension cord tied around his waist as a safety line.  The roof is 6/12 which isn't very steep but this guy seemed new at walking on roofs and the roof ZIP System was kind of slick..especially if it is damp.